Santa Rosa · before you text us
The five-photo checklist that stocks the van before your Santa Rosa Sub-Zero visit
Reading the model number is one job; photographing the right things is another. This is the shot list that lets a Santa Rosa technician load the correct gasket, fan, board or ice module before leaving the shop.

Direct answer
Send five photos before booking: the full model and serial tag, the control panel, the door style straight-on, the condenser behind the lower grille, and any error code on screen. Together they confirm part revision, refrigeration layout and dust load so a Santa Rosa visit finishes in one trip. Call (628) 209-6820.
Why a shot list
Why photos beat a phone description in Santa Rosa
Over the phone, "it's a Sub-Zero, the big stainless one" describes hundreds of units. A built-in BI-36 from a Fountaingrove remodel, a panel-ready BI-48 in an Oakmont kitchen, and a Designer wine column in a Bennett Valley cellar share a badge and almost nothing else — different gaskets, fans, control boards and ice modules, and sometimes different refrigerants spanning the R-12, R-134a and R-600a eras found across older and newer Santa Rosa homes. Words cannot bridge that gap; pictures can.
A good photo set lets us pre-pull the likely parts before a technician leaves the shop, which matters in Sonoma County where a return trip means another drive across the valley to Healdsburg, Sebastopol or out toward Sonoma. The goal is simple: turn one diagnostic visit into a finished repair. The diagnostic is $95–$150 and credited toward the work, and a strong photo set is the cheapest insurance you can buy on that single trip.
It also makes the quote honest sooner. When we can see your unit before arrival, the flat-rate estimate we approve with you is grounded in what is actually on the wall rather than a verbal guess, so there are fewer surprises once a panel comes off. None of these photos replace the on-site diagnosis — a Sub-Zero still has to be tested under load and with the cabinet treated carefully — but they make that diagnosis land right the first time instead of becoming the start of a two-visit story.

The five shots
Exactly what to photograph, and what each one stocks
Take these five in order. You do not need all of them to book, but each one you add narrows the parts we carry. If a unit type is awkward to reach, the next section maps where each tag hides.
A few framing habits make every shot more useful. Shoot in landscape for wide units and square for the tag, turn the phone flash on for interior shots, and wipe the lens first — Santa Rosa kitchens collect a surprising film of cooking haze and hillside dust that quietly fogs a close-up. Hold the phone parallel to the tag rather than at an angle, because a skewed serial is the single most common reason we have to ask for a re-shoot.
Here is what each photo actually does once it reaches the shop:
- The tag confirms the precise part revision and refrigerant era, so the gasket, fan or board we carry matches your production run rather than a near-miss.
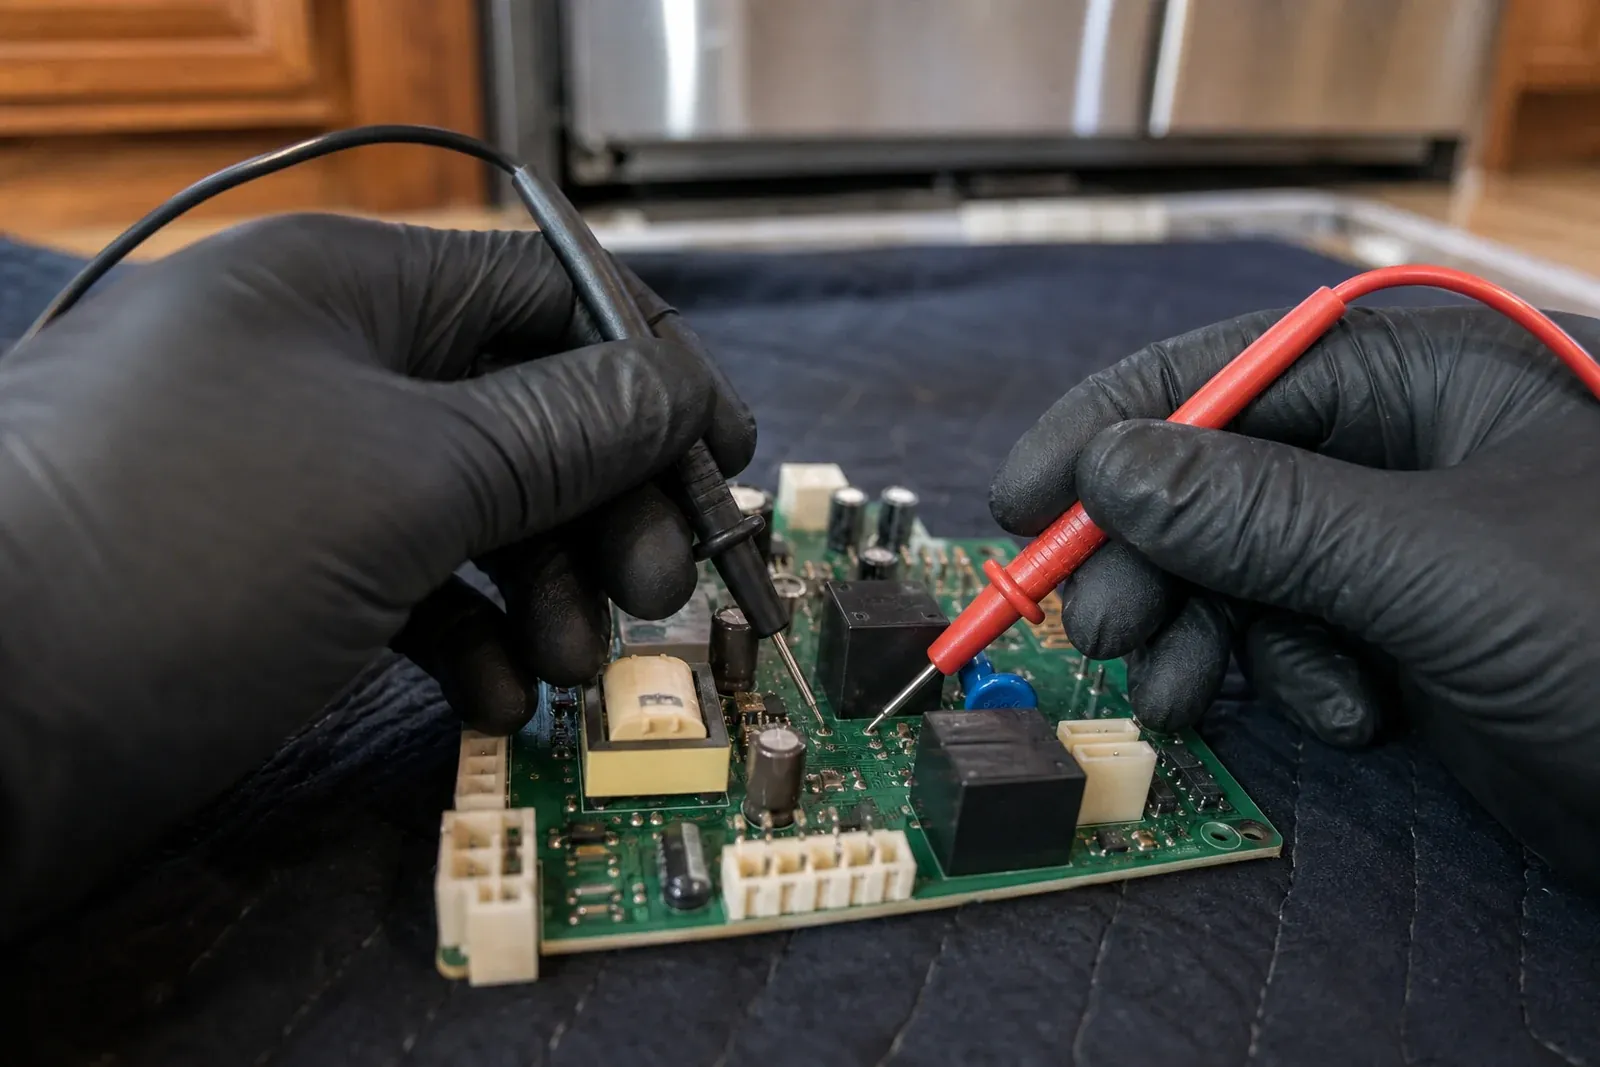
- The controls separate older mechanical-dial units from electronic-display generations, which tells us whether a fault is likely a sensor, a relay or a control board.
- The door style distinguishes a panel-ready front from stainless, and a column from an over-under built-in — each takes a different gasket profile and hinge hardware.
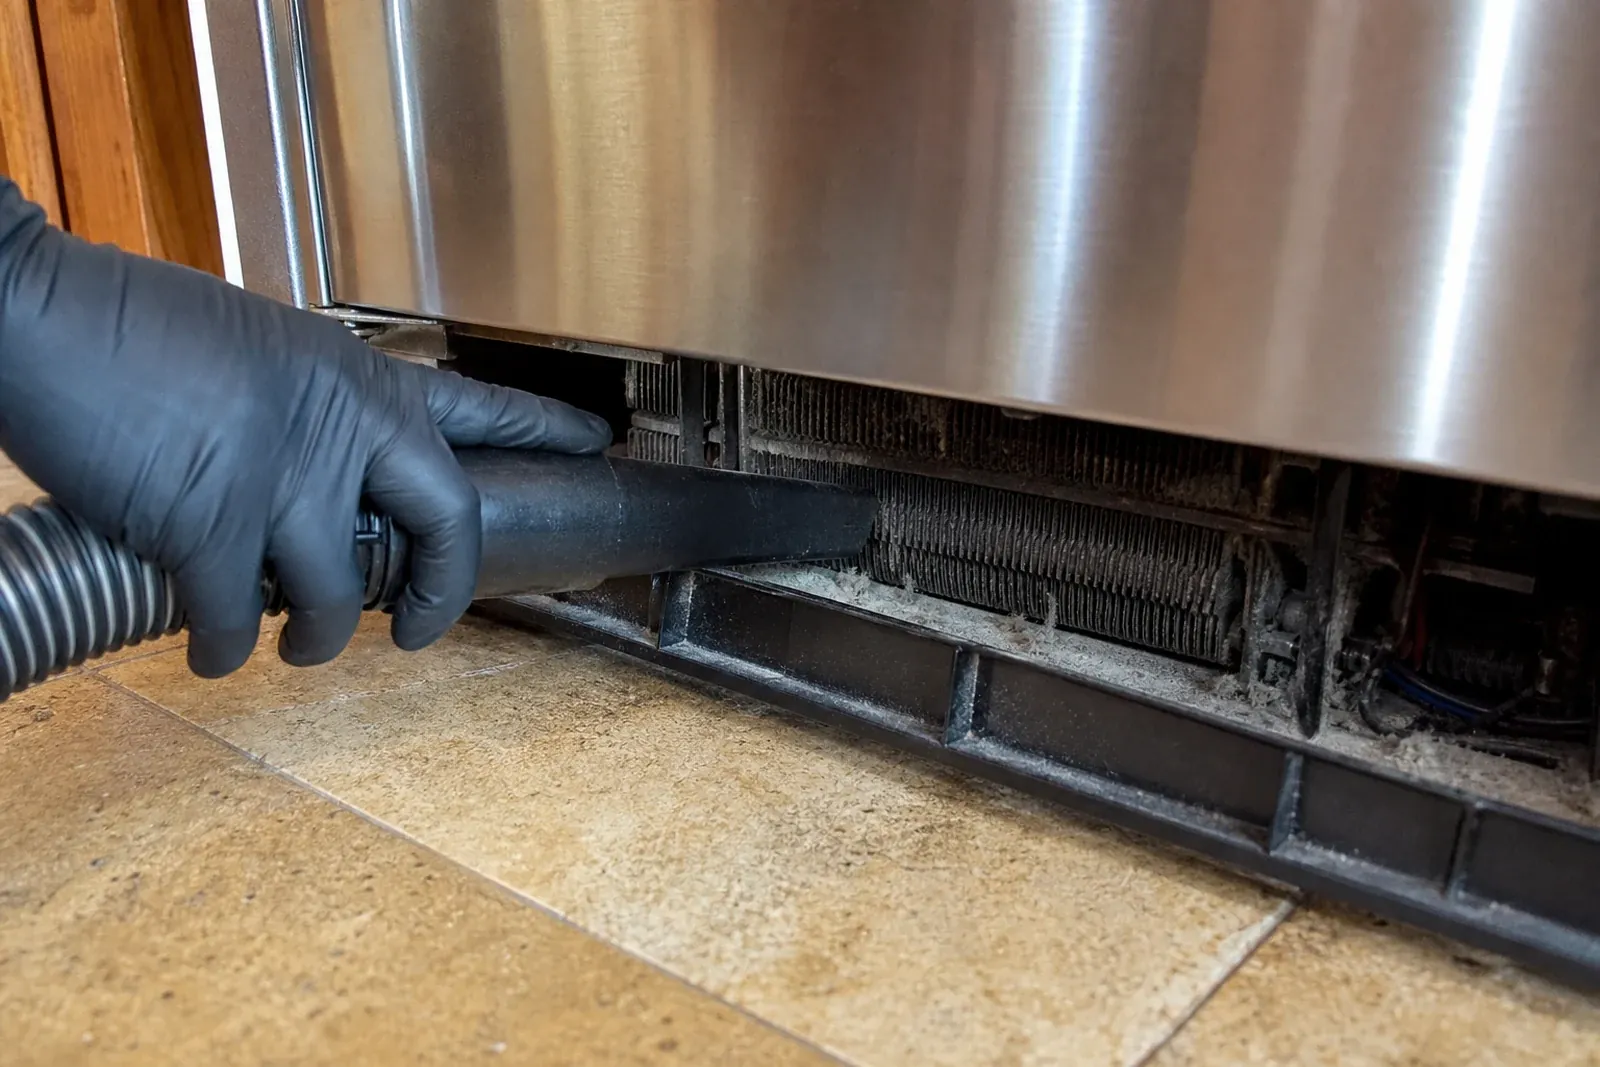
- The condenser shot shows real-world dust and ash load, which in this county often reframes the whole call (more on that below).
- The code or alarm points us at a fault family before we plug in a single meter.
| Photo | Where to aim | What it lets us stock |
|---|---|---|
| 1. Model & serial tag | Inside cabinet, on the tag itself | Exact part revision, refrigerant era, door handing |
| 2. Control panel / display | Straight-on, screen or dials lit | Electronic vs. mechanical control, board generation |
| 3. Door style (front) | Step back, whole front in frame | Panel-ready vs. stainless, column vs. over-under, gasket profile |
| 4. Condenser / lower grille | Crouch at the toe-grille | Dust and wildfire-ash load, coil and fan condition |
| 5. Error code / alarm | The screen as it reads now | Fault family, likely sensor or board path |
Tag locations
Where the tag hides by Sub-Zero type
The model and serial tag is the one photo worth hunting for, so it is worth knowing where to point the camera. Locations moved across generations, which is why a quick check of two or three spots beats settling for a controls-only photo. (For decoding what the number means once you have the shot — how to read the family and production run — the model number guide walks through it. This page is only about getting a clean picture.)
- Built-in BI (36 / 42 / 48): look first at the top interior wall on the fresh-food side, then the upper side wall; many built-ins also carry a tag behind or just above the lower toe-grille, so check there before giving up.
- Designer & PRO columns: the tag sits on the interior side wall near the top, or along the door jamb beside the hinge — the usual spots in the panel-ready Oakmont and Skyfarm installs where the cabinet front deliberately gives nothing away.
- Undercounter & wine columns: check the interior side wall, behind the kick panel, or low on the door frame; on a wine column the tag often hides behind the top rack, so you may need to slide a shelf to reach it.
A practical tip for the awkward spots: use your phone's front camera or shoot blind and check the result, rather than craning your neck into a tight column. If the tag is faded, sun-bleached or unreadable — common on the older Rincon Valley and east-side estates that have run the same unit for decades — photograph whatever remains and lean harder on the controls and door-style shots. Between the partial tag, the control generation and the door layout, we can usually narrow a model and confirm the rest on site. Genuine OEM parts only follow once the match is certain, so a little hunting now keeps the wrong part off your invoice later.
Local angle
The condenser photo Santa Rosa homes especially need
Photo four earns its place here more than almost anywhere else in the country. Hillside neighborhoods — Fountaingrove, Skyfarm, Mark West Springs and Riebli Valley — pull fine dust into condenser intakes year-round, the inland summers push the compressor hard against hot dry air, and wildfire-season ash can blanket a coil in a matter of days. A crouched shot at the toe-grille, flash on, tells us whether your "warm fridge" call is likely a packed condenser forcing the compressor to run long, or something deeper in the sealed system.
That single distinction changes what rides in the van. A dust- or ash-loaded coil points toward a condenser clean and airflow check — often the whole fix, and one that prevents a needless sealed-system conversation. A visibly clean coil paired with warm temperatures and a compressor that never seems to cycle off points instead toward fans, controls, a thermistor or genuine sealed-system work. Sealed-system repairs run $900–$1,800 and require EPA Section 608 Universal certification to do legally and correctly, so knowing which path we are likely on before arrival keeps both the quote and the conversation honest. Most other Sub-Zero repairs land in the $200–$650 range.
If you can, pair the condenser photo with two quick facts in your text: how long the unit has felt warm, and whether the kitchen itself has been unusually hot. A two-day warm spell during a July heat wave reads very differently from a fridge that has drifted for weeks with a clean coil, and that context helps us load the right diagnosis path instead of the most expensive one.
How to send
How to send the photos so nothing gets lost
Once you have the set, getting it to us cleanly is the last step — and it is an easy one to fumble, so a short routine helps. The order that works best in practice:
- Call first at (628) 209-6820 so we know a unit and a Santa Rosa address are on the way, then text the photos to the same number in one message rather than several.
- Send full-resolution images, not screenshots of screenshots — re-compression is what smears the small print on a serial tag and forces a re-shoot.
- Add the numbers in text: your current fresh-food and freezer temperatures, and roughly how long the symptom has been happening.
- Name the neighborhood (Bennett Valley, Oakmont, Rincon Valley, Fountaingrove, and so on) and a cross-street if you have one, so dispatch can route the visit efficiently across the county.
- Flag access notes — a panel-ready front, a unit boxed into custom cabinetry, or a gated Skyfarm driveway — so the right approach and tools come along.
Prefer to handle it online? Use our booking page, then text the same set to (628) 209-6820. Either way, the photos let us approve a flat-rate quote before any work begins and arrive with genuine OEM parts matched to your exact part family, on a single cabinet-safe visit. You can also review the broader repair preparation checklist if you want to clear access and pull readings before we arrive. And if you would rather just talk it through over the phone, that is completely fine — this checklist is a head start for a smoother first visit, not a requirement for booking one.
Next step
Call with the Sub-Zero model number
Have the model-tag photo, current fresh-food and freezer temperatures, and the symptom timeline ready. That lets the Santa Rosa intake route the visit around the likely Sub-Zero part family instead of a generic appliance script.
FAQ
Questions Santa Rosa homeowners ask before scheduling
What photos should I send before a Sub-Zero repair in Santa Rosa?
Five: the full model and serial tag, the control panel, the door style straight-on, the condenser behind the lower grille, and any error code on screen. Add your current temperatures in the text. Together they let us stock the van for your exact unit before driving out across Sonoma County.
Do I really need a photo of the model tag if I can read the number to you?
Yes, when you can. A photo shows the full serial and any revision marks that a spoken number drops, and those marks change part revisions for gaskets, boards and ice modules. If the tag is unreadable, send what remains plus the controls and door-style shots.
Why do you want a photo of the condenser area?
In hillside Santa Rosa neighborhoods like Fountaingrove and Skyfarm, dust and wildfire ash pack the condenser and make the compressor run long, mimicking a deeper fault. A toe-grille photo often tells us whether your warm-fridge call is a cleaning or a sealed-system job before we arrive.
How do I send the photos to you?
Call (628) 209-6820, then text the set to the same number in one message, or use our online booking page. Send full-resolution images, not compressed screenshots, so the small print on the serial tag stays readable.
Can I still book without all five photos?
Absolutely. Even the tag photo alone makes a one-trip repair far more likely, and we can diagnose on site without any. The five-photo set simply gives the best odds that the right gasket, fan, board or ice module is already on the van when the technician reaches your Santa Rosa kitchen.
My panel-ready column has no visible badge in Oakmont — where is the tag?
Panel-ready Designer and PRO columns hide the tag inside: check the upper interior side wall and the door jamb beside the hinge, and behind the top rack on wine columns. Photograph that interior tag plus the control board, since the panel front tells us nothing on its own.
Related